Friday, July 29, 2011

Master Bedroom Makeover thoughts


So a couple months ago The Hubs and I decided it was time for a new bedding set.  After many Internet search sessions and store trips, I think The Hubs was D-U-N-done! He saw this one and said I like it lets just get this one!
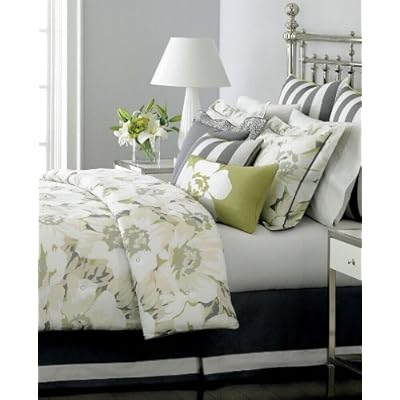
So we did.  I grabbed the Cal King size and headed to the register...not LOVING it at all...but still it was nice...I just wanted something else ENTIRELY...but it's not just my room, so we compromise.  As I'm in line at the register I notice it's martha stewart...YUCK!!! I cannot STAND her and it almost makes me put it back, but the look on The Hubs' face had me staying in that line! ;o)

Now don't get me wrong...it does look good in the picture, but in our room in real life...it looks like army camo.  Our room is so small and brown, that it doesn't look good. AT. ALL.

I know there is HUGE potential here, and I know our room can look great so I've been thinking of painting gray and white stripes.

At first I was thinking of painting it like the stripes in Landee's dining room like this.
But now I'm thinking I'll just use the same colors that Landee used, but in the pattern like this from Centsational Girl's staged townhouse adventures.
I like the varying height of the stripes.  

What do you think?

Lots o' love,

Megan

Sunday, July 17, 2011

Magnetic Puzzles

Now you need some fun stuff for your travel trays!
I grabbed some puzzles from Dollar Tree and a magnetic tape roll from Michael's.  I cut tons of little pieces, peeled off the paper backing and stuck it on each piece. Now you have a puzzle that the kids can do in the car, and not loose pieces!  When we were in the car on our trip, my 5 year old wanted to do the puzzle after dark.  My husband happened to have a headlamp.  He was so happy with his headlamp, travel tray, and his 100 piece buzz puzzle.  Good times!!!

Friday, July 15, 2011

magnetic travel trays

 
Do you have any travel plans this Summer?  Need to keep kids occupied?  Awesome!  Go to Dollar Tree and get yourself some little cookie sheets, spray paint, mod podge, foam brushes, and scrapbook paper.
Spray paint the tray...this eliminates reflection from the sun in the car, and it's fun! Cut scrapbook paper to fit the bottom. You can use a corner rounder punch to make the corners awesome.
Spread a thin layer of mod podge on the bottom.
Lay your paper down.
You can use a brayer to help smooth it out if any bubbles form. Once it's down, add a coat of mod podge on top and wait for it to dry.
You now have a great travel tray!

Wednesday, July 13, 2011

Hilarity

I just found the funniest thing ever!

Cheri over at I Am Momma Hear Me Roar is hosting Blogger Bloopers week.

You know how everything looks nice and perfect in Blog-land, but it really isn't!? If you're a blogger, you know what it's all about!  Sometimes I'll take a picture and look at it and in the background I notice something like, mac&cheese all over the floor, kids running around without shirts or only one sock (???), or tons of toys and clothes strewn about, or just trying to strategically take a picture without revealing that you actually didn't get dressed that day...you know how it is!

Well if you read her whole post then at the end you'll get to see THIS treat!  It makes me laugh SO hard EVERY time I see it!  I don't know if it's that split second look of horror/surprise/disgust on her face or if it's the way she says her husbands name...JEEEFF-RRRYYYYY!!!  Ees da bess! (I love Nacho Libre)

If you need a good laugh, go check it out!

Tuesday, July 12, 2011

Jean Purse

While my sister and her family were visiting, my niece wanted to make something. She decided to make a denim purse.  I had tons of jeans for my Americana/Denim Quilt so I let her go through them.  She chose size 5 Gap Kids jeans.

 She cut them straight across at the crotch.
 She pinned it.
 Sewed it.
 And cut a strip from the leg as a handle/shoulder strap.
She hand stitched the strap in place and it's the cutest purse ever!  There are the front and back pockets to put things in, and the jeans had an adjustable waist so she can cinch the top in if she wants!

I didn't get an after pic, but it looks like the second pic with a strap.  I'll see if she can take a pic and I'll put it on later.

What do you do with old jeans?

Lots o' love,

Megan

Monday, July 11, 2011

New "hardwood" kitchen floors


When I moved into my house I inherited ugly laminate floors that didn't match anything else in the kitchen.  A couple years after I moved in, I did a mini makeover to my kitchen with paint.  I painted my countertops, I painted the walls, and I painted the ugly laminate floors!  It all worked quite well but with 4 children the floors got scratched and dinged and I needed to find another inexpensive solution for the floors until we can afford our dream kitchen.  

Well, contact paper has been one of my best buds for ages so I thought I'd give it a try on the floors.  I actually test drove it in the kids bathroom first.  I figured if it could stand it in there, that it would work in the kitchen as well.

3 rolls is all my kitchen takes.  It's a very small, like a bowling alley! So for about $15 every year or two, I recover my kitchen floor with contact paper.  It's very easy to use and very forgiving.  You can't really tell where seams are unless you look for them. 

Here's how to do it.
 Start with a nasty floor.  I contact papered this a year or two ago...honestly can't remember.  There's adhesive, drywall mud, paint splatters and scuffs that couldn't be cleaned.
 At a glance it doesn't look so bad,
 but close-up you can see scuffs and scratches.
 It had peeled in some of the corners so I took an x-acto knife and cut back far enough to where it was still adhered well.
 Like this.  You can just cover right over it.
 Cut a basic shape of the space you need to fit, then after you peel the paper backing off and smooth it down, go in with the x-acto knife for precision cuts.
My #2 son who is 6 wanted to take pictures of me for blog.  Then he said, "What about the reporting part, Mom? Can I do that?"  I figured out he wanted to film and talk about what we were doing so here it is!  Don't mind the shaky camera.  I love his little voice!  I can't believe how he knew what I was doing and everything.  Too cute!  

My little man would love some comments!
 Cutting around the toe kicks and oven.
 All done!  All new and nice and clean...no drywall mud and other nonsense!
I love a new "wood" floor! ;o)

Now that's my kind of makeover!

What random things have you done lately?

Lots o' love,

Megan

Sunday, July 10, 2011

Front Door Frame


I found this awesomely chunky frame at a yard sale a couple weeks ago.
 I spray painted it with Rust-o-leum Metallic Silver.  It covered REALLY well. I love Rust-o-leum!
 The velvet trim didn't take the paint so I improvised.
 I scrounged around for ribbon and heated up my trusty glue gun.
 I used 2 different techniques for the ribbon.  For the turquoise ribbon I cut each of the 4 pieces at an angle.
 I see how long I needed to cut it, I butted up the corners together and 
 cut the angles using the frame as a guide.
 Then I glued one end making sure it met the other corner piece.
 Last I ran a bead of glue on the other part and pressed it down.
This method worked out alright...but then I thought of something I liked better!
 Instead of pre-cutting all 4 pieces and then hot gluing, I just cut and glued as I went.  This worked out MUCH better!  I laid the first side down, ran glue, pressed it down,
 and THEN clipped the corners at an angle.
 You can see the difference in techniques here.  The yellow miter cut doesn't have any space, and the turquoise has a teeny gap...barely noticeable, but enough to let you know there's a better way to do it!
 Here's what it looks like with the ribbon all on.  I love turquoise and and nice sunny yellow together!
 Since the frame was originally meant to be hung in landscape format, I needed to change it since I was going to use it in portrait format.  I grabbed some screws and my husband's drill to make a picture hanger.
I LOVE my husband's drill!  Can you tell the glue gun and ribbon are it's friends!
 I slapped a couple screws in there
 and twisted some craft wire around them
 back and forth a couple times
until it was nice and strong.
 I printed a quote Cindy sent me from Cinsarah's Etsy shop and put glue dots on the corners and put it in the frame.
 So now instead of my front door screen looking like this...
 ...it looks like this!
Don't you love the graphic?!  Go buy one for yourself!

Lots o' love,

Megan